

Sunday, March 25, 2012
Spring has sprung at BabyCakes Creations 
Check out the newest items in my shop! Come grab some spring for a special little girl's hair... or even your own :) And come like BabyCakes on facebook. When it reaches 250 likes (almost there!!), I will host a giveaway for a sweet fabric flower clip!

Tuesday, March 20, 2012
10 things to do with a sick (young) kid
While I generally have very healthy kids, this winter has felt like one illness after another. Having sick kids is no fun, and the biggest reason for me is how sad it is to see their normally endless energy selves feeling so lethargic and icky. When my kids get sick, they get pretty spoiled (as they should when they are sick in my opinion), and I try to bring as much "fun" to the sick party as I can.
Here is an art project A and I did together today while she was sick at home. I wasn't sure we were going to get to it because she was pretty much glued to the couch all day, but she surprised me with some evening energy to move to the table for a little craft time. I was inspired by this. It provides a bright and cheerful piece on our playroom art wall and fitting for the first day of spring (even though it still feels like winter outside).


10 things to do with a sick (young) kid:
1. The obvious go-to - watch movies.
2. Build a fort. Snuggle and read books together in it by flashlight.
3. Make homemade playdough. Even though you have a huge bin of it already, because making your own is really cool to a kid (and pretty cool to me as an adult too).
4. Print out new coloring sheets and let them pick which ones. We like Disney, Sprout, and Nick Jr.
5. Have a pretend birthday party for a special doll or stuffed animal.
6. Sing silly songs together. Laughter heals all.
7. Build a "snuggle nest" (huge pile of blankets and pillows) and snuggle, sing together, read together, nap together, watch movies, etc.
8. Plan a special art project to do together. (see ours from today, above)
9. Play "Couch I Spy" - just like regular I Spy but from the comfort of the couch - if you can see a window you can include things outside too.
10. Talk. About everything, and nothing, and all the things you haven't taken the time to ask about or talk about during the normal hustle and bustle of healthy life.
What do you do with your kids to make sick days a little more fun? I would love to hear your ideas too!


Here is an art project A and I did together today while she was sick at home. I wasn't sure we were going to get to it because she was pretty much glued to the couch all day, but she surprised me with some evening energy to move to the table for a little craft time. I was inspired by this. It provides a bright and cheerful piece on our playroom art wall and fitting for the first day of spring (even though it still feels like winter outside).


1. The obvious go-to - watch movies.
2. Build a fort. Snuggle and read books together in it by flashlight.
3. Make homemade playdough. Even though you have a huge bin of it already, because making your own is really cool to a kid (and pretty cool to me as an adult too).
4. Print out new coloring sheets and let them pick which ones. We like Disney, Sprout, and Nick Jr.
5. Have a pretend birthday party for a special doll or stuffed animal.
6. Sing silly songs together. Laughter heals all.
7. Build a "snuggle nest" (huge pile of blankets and pillows) and snuggle, sing together, read together, nap together, watch movies, etc.
8. Plan a special art project to do together. (see ours from today, above)
9. Play "Couch I Spy" - just like regular I Spy but from the comfort of the couch - if you can see a window you can include things outside too.
10. Talk. About everything, and nothing, and all the things you haven't taken the time to ask about or talk about during the normal hustle and bustle of healthy life.
What do you do with your kids to make sick days a little more fun? I would love to hear your ideas too!
Linked up to Linky Parties:
Thursday, March 15, 2012
Re-Purposed and Grown Up
A had a very girly, very pink baby nursery. When she started becoming more of a little girl, I re-did her room (adorable owl theme - and blue walls...I think I had enough of the pink). I sold and donated some of her nursery decor items but a few of them I held onto to re-purpose (even though I didn't know yet what for). This is one of those items I kept.
 I loved this coat hanger in her nursery. I love what it said, and it just fit with the sweet pink theme that was going on in there. (I searched my computer files and could not find the before picture of this - not sure what happened to it. So I found this pic of the exact same print. The only difference is mine didn't have a frame and it had hooks for a coat rack. But the design/saying/colors are identical.)
I had many ideas of what I wanted to do with this, but ultimately, I decided it needed a home in the playroom. Here is what I did to it:


I think it turned out cute. Fun and bright - and much more grown up (kid grown up...) than the sweet babyish decor it once was. And best of all, it serves a purpose! It is perfect for hanging up dress up clothes, and while it doesn't hold all of them (hence the bin below it), it highlights some of A's favorite dresses. I love functionality. Ultimately it was a little sad to cover up those sweet words, but I like knowing they are still under there and I LOVE that I was able to re-purpose something that no longer worked for us.
What items have you re-purposed? I'd love to hear about them!
Linked up to Linky Party:

I had many ideas of what I wanted to do with this, but ultimately, I decided it needed a home in the playroom. Here is what I did to it:
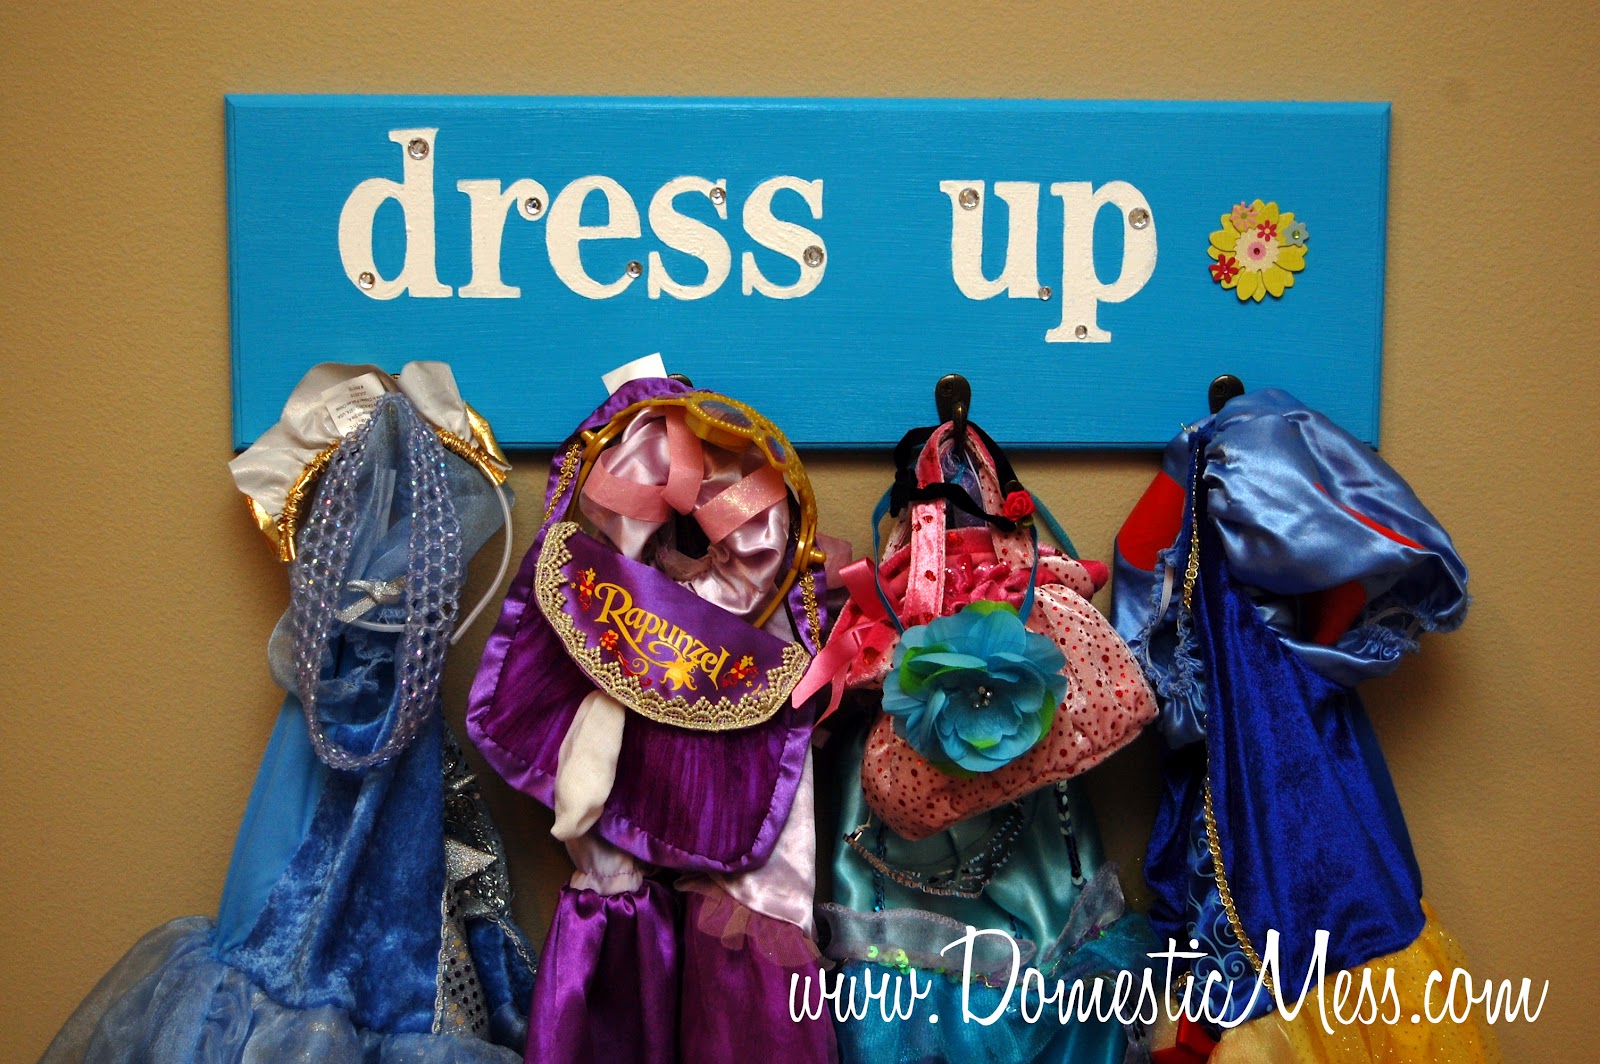
Bright blue paint, white letters, some flower detail, and of course a little bling for her majesty. Screwed the hooks back on and voila! Easy enough.

What items have you re-purposed? I'd love to hear about them!
Monday, March 12, 2012
10 Reasons the Sock Bun has changed my life...and will change yours too!
One of my {many} favorite things about Pinterest are the amazing hair tutorials I find. I am generally a pretty low maintenance girl in the beauty department. The hubby will tell you it takes me forever (in guy time) to get ready {my hair takes a long time to dry and my waves need taming...it's out of my control!}, but I don't fuss with fancy hair styling on the average day, or wear much makeup.
Pinterest has taught me to do some of the things I like, without all the high-maintenance work...shortcuts really. One of the best tutorials I have found is this sock bun tutorial (they are not all the same method - and this is not the sock bun curls method - which made me look like I stuck my finger in a light socket...not my best look. Maybe I need to give it one more try to rule out user error). I have also done the sock bun by keeping the sock unrolled and putting it over my ponytail like a tube, then rolling it from the top down - both ways work for me. It takes an otherwise skimpy sloppy potentially boring style and gives it lots of volume, with some sophistication and class. It can be as polished or as messy bed-head {see photo below!} as you want. It is awesome. And as dramatic as it sounds, it has truly been life-changing.
Here are 10 reasons why:

1. It is EASY. You can do this style in literally 30 seconds {once you have it mastered}.
2. It is awesome for trying to stretch hair an extra day between shampoos {the last stylist I saw said I should only be washing my hair 2-3 times per week! He said my hair would actually adjust and produce less oil. I'm not quite there, but I am trying to go longer stretches when I can}
3. It is great for a working mom who wants a quick polished style.
4. It is great for a stay-at-home mom who wants
5. It makes me feel like I have voluminous hair out of a magazine ad. I have to reach back and feel my bun several times per day in awe of it's
6. It is a fabulous way to recycle a sock that has lost it's mate.
7. I get lots of compliments on it. I love telling people there is a sock on my head and watching their faces.
8. You could get away with doing your hair the night before and would just need a few quick bobbypin touch-ups to it in the morning. {I have not tried this per say, but when I tried the disastrous sock bun curls, I noticed before I took the bun out how well it had stayed in place after sleeping on it all night}
9. It can multi-task - it's the "do" for all occasions. Kid's dance class, date night, girl's night, client meeting, job interview, trip to the zoo, lazy day, busy day...you get the idea.
10. It is Pacific NW winter weather friendly. We live in a climate with lots of rain. My hair does fine in this when it is left to it's curly/wavy devices. But most of the time I prefer to straighten or curling iron it, which does not bode well on wet days. This style stays in place, doesn't frizz out, and feels more pulled together than a ponytail.
There you have it, my 10 reasons for loving the sock bun almost as much as nap time. Let me know if this works as good for you!
Sunday, March 11, 2012
Pinterest Crayon Art
If you are on pinterest, then I'm sure you have seen this or something like it a bazillion times by now. From the moment I saw it I knew I was going to make one for the playroom.
I gathered my supplies (crayons, canvas, glue gun, hair dryer) and got started.


I gathered my supplies (crayons, canvas, glue gun, hair dryer) and got started.

I hot glued all my crayons on in a rainbow-ish order...

And then, I broke out the hair dryer. I gather my kids around for the show...and had no anticipation that it would take SO long! After 2 minutes, my almost 2yr old of course lost interest and ran off to something else. My almost 4yr old lasted about 15 minutes and then she got antsy too and was off to something more interesting. I envisioned this project with my kids, their little eyes in awe at the melting crayons... Instead, I was sitting by myself on the kitchen floor over a large piece of cardboard, holding a crayon canvas and a hair dryer for what felt like hours.
First I didn't do it right - I didn't know there was a "right" way and none of the tutorials mentioned there was. Apparently I was supposed to just know this, so incase any of you are not experts at crayon melting I will share what I learned. First, do not put the hair dryer at an angle. This created splatter everywhere. I am ok with some of it, but I quickly realized that was the very messy way to proceed (turning the hair dryer on high vs. low makes this worse...I kind of knew that would happen but I was getting impatient). It also made the colors want to go off to the side and not straight down from the crayon. I figured this out quickly luckily. You want to aim it directly straight on at the crayon and hold it close...like pretty much ON the crayons. Holding it this close will also make it go MUCH MUCH MUCH faster. I think I was 30 minutes in before I discovered this and it made a world of difference. The other thing, I originally focused on the crayon tip. Don't do that. Focus a little lower than center of the crayon - it really made things flow better.
I had started on the right side of my board and by the time I got to the left side I had the system down. So much so that I decided to try going back to the starting side and re-melt some of the crayon to make it look better. Well, that was a great idea...except my hair dyer quit. You can see where there is a tiny bit of white space between the drips and crayons on the purple and part of the blue...this is what I was trying to fix. I thought it had over heated, but nope, the crayon melt project ended up being a bit more expensive and cost me a hair dryer. Oh well, we got a fun piece for the playroom out of it. I love how it turned out and the kids had that awe in their eyes I had been hoping for finally... once it was done. I will not likely be doing this project again, but I am really glad I did it once. How many dripping crayon art canvases do you need anyway?

Thursday, March 8, 2012
Playroom Art Display
My children create a lot of art work. Since my daughter started preschool, her contribution to this has easily quadrupled. I needed a way to display some of the favorites and thought the playroom was a perfect place for this.
I saw this on pinterest and was inspired to get started.
I originally was going to use a wire with clothespins but the more I thought about it, the less I liked that idea. When I saw the idea with wood it all clicked. I decided to use some boards and clothespins for mine. I found some lightweight boards at the craft store. They were light enough to easily hang on the wall, but firm enough to be durable. I painted them a lime green - a nice, bright gender neutral color that brings life to our playroom's khaki walls. I covered the clothespins with ribbon (because it's way faster and easier then taking them apart and painting them, and I liked being able to add in some fun prints) and then measured their spacing on the boards.

Then I hot glued the clothespins on. I thought about using wood glue, but hot glue did the trick and I didn't figure anything too heavy would be hanging on these for it to matter.

I added picture hangers to the back of the boards and hung them on the wall. And then hung a few of the pieces of artwork stacked on our counter from the week.

For what I wanted, this was a quick and easy project and it turned out how I envisioned. My preschooler beams seeing her art work hanging while we play. Now when she paints or colors she asks "can we hang these on the wall too?" Maybe I should have made longer boards!
Friday, March 2, 2012
Running and a fun project for those race bibs!
Last summer I ran my first 5k. I had spent my whole life loathing running...and avoiding it at all costs. I went from not being able to run around the block to running my first 5k in a couple months via a couch to 5k type app called 5k Runner. It gradually increased my running time, while building my endurance and confidence.
In the past, I would try to run as long as I could, then panting and out of breath, walk for a while...and end up discouraged that I could not run very long without needing to stop (and try to breathe!!). I also got hubby on board running with me. It is something I enjoy doing with him as well as on my own (and not just because he pushes the double BOB...though that IS nice!!) Running together provides time for conversation without distraction, and opportunities to encourage each other to push harder. Running alone is like my own private meditation with my thoughts. Both are nice.
Running became a peaceful and surprisingly enjoyable place for me to escape in. If I am having a tough day with the kids, a run is just the ticket to refresh me. If I am mad about something, I run faster, harder, and farther - and feel much better at the end. Even on a "perfect" day, a run is a great time for me to collect my thoughts and ideas.
I can now say, I really enjoy running...and I never thought I'd say that...ever. Once I did my first 5k, I felt empowered and inspired to keep running. I did a few more. I took a break through the winter months since I am big baby for being cold and how my lungs feel running in frigid temps, but spring is here (well, almost) and I am ready to go again and have started signing up for more runs. I am lucky to know some great mama friends of varying levels who inspire me to run with them. I am not the fastest by any stretch, but I finish running and that feels great. I also have zero desire to move beyond a 5k. 3 miles feels just right for me - at least at this point.
After the runs, I am left with these race bibs - reminders of some fun and challenging times (YES, I referred to running as "fun" - crazy, right?!). I don't want to throw them out, but I also didn't really know what to do with them. I stumbled upon some ideas on pinterest (of course) and the wheels started turning. I ran (pardon the pun) with the inspiration I found to make it my own and fit what worked best for me.
I got a board from the craft store and painted it a couple coats of a nice charcoal grey. Then I stenciled on "RUN".

This was my first time stenciling. I had to do each letter separate so they didn't mess each other up, and I did a couple coats of a fun marigold yellow (I have NEVER been a yellow person, but I have been loving grey and yellow together lately so this may be my first item of decor with yellow on it!). The letters were a little messy...

so I cleaned them up with a small paintbrush and my charcoal grey again.

Finally, I used some screw hooks and placed them where I wanted them. (They fit all the bibs I currently have, but if I need to add a different size later I can, or I might just punch additional holes in the bibs to make them work for what I already have in place.
And finished! Easy, functional project, ready to hang in my craft room. Love it!

Thursday, March 1, 2012
Amazing chicken salad!
After G was born, some very great friends brought us dinner. It was spring and warm out, and this light meal was perfection. It is my go to chicken salad recipe and I make it quite a bit. Sorry no photos. I get too excited to eat it and forget about photos.
Adapted from Allrecipes.com: Holiday Chicken Salad
Amazing Chicken Salad
4 chicken breasts, cooked and cubed
1 cup mayonnaise (I keep considering trying a healthier version of this with greek yogurt and nixing or cutting down on the mayo, but I love it so much as is, I just can't bear to mess with it. I once made it with vegennaise and that was a very sad fail. )
1 tsp paprika
1 tsp seasoning salt
black pepper to taste
1/2 cup craisins (this is plenty for me, and hubby picks them out - you can add more or leave out. The original recipe calls for three times this amount)
1 cup chopped celery
halved grapes - green or red. Add to taste - I probably use roughly 1 cup but don't measure. I like grapes in almost every bite.
Occasionally I will add some chopped apples and that is good too - completely optional - it is great without it
Mix everything together minus chicken. Once thoroughly combined, add chicken and refrigerate for at least one hour prior to serving. Serve on croissants and enjoy!
Subscribe to:
Posts (Atom)