Monday, January 7, 2013

Meal Planning & Meal Plan for week of 1/7-1/13

I thought I would start posting my weekly meal plan here...since I make one every week, figured maybe someone else could benefit from some ideas for dinners too. I will link to or include recipes when possible.

While I plan meals specific for each day, on occasion the day will come and that meal doesn't sound good - I reserve the right to flip my meals around through the week, but usually follow the menu pretty close. I try to do at least one crock pot meal per week, and I also like to make things that allow for leftovers - we can make another night's meal, or often eat them for lunch.

I have tried meal planning more than one week at a time, and I just don't like it - that's just me. I could maybe handle two weeks, but still prefer one. I usually know our weekend plans one week out so can account for dinner guests, or dinner out - two weeks out I sometimes don't know yet what the second week's plans will be. You have to do what works for your family though - I know people who plan a month out at a time and it works for them. I also know people who meal plan out breakfasts and lunches, but that is a little much for me :) I have a chalkboard on the front of our fridge that I write our weekly menu on so we always know what's for dinner.

Making a meal plan has been absolutely essential for my family for several reasons:
1. It is MUCH easier to eat healthy meals when you have it planned out before you are in starvation mode (on that note, don't meal plan when you are hungry...it is similar to grocery shopping hungry, though not quite as dangerous.)
2. It is EASY and takes out the guess work. It takes me maybe 15 minutes with my super organized recipe binder to pick out meals for the week, and I won't end up staring in the fridge at dinner time wondering what to make. I also try to add in a new recipe to try about every week.
3. It saves money on groceries. Seriously. Once I have my meal plan complete, I make a grocery list based off my recipe ingredients and it eliminates a lot of purchases of things that "look good". And I never end up standing there ready to make a recipe and realize I am out of one of the ingredients. It also eliminates the need to run to the store for that one ingredient (which, if you are like me, means leaving the store with 10 things you didn't need at all). A little plan and prep goes a long way. I also try to plan entire weeks (like this week) where I plan meals based solely off what we have on hand already.

{Meal Plan 1/7-1/13}

Monday - Leftovers from the weekend

Tuesday - Crockpot Turkey Chili (1lb ground turkey, 1 medium chopped onion (or frozen chopped onion), minced garlic (equivalent of 3 cloves), 1 can diced tomatoes, 1 can drained and rinsed kidney beans, 1 cup water, 1tbsp chili powder, 1 tsp cumin, oregano, coriander, red chili flakes. Brown the meat in a little olive oil and then throw everything in the crock pot on low all day.)

Wednesday - Parmesan Chicken (new recipe to try this week) with broccoli and bow tie pasta

Thursday - Meatballs & Rice (We buy the frozen pre-cooked beef meatballs from Costco. Heat some up with teriyaki sauce on the stove, add frozen veggies to the last 5-10 minutes of cooking, serve over brown rice)

Friday - Pizza and family movie night (Often we make our own pizzas, but this time we are using some coupons from Papa Murphy's...our favorite pizza!!)

Saturday - Crockpot Salsa Chicken tacos (Throw 2-3 frozen chicken breasts in the crockpot with a jar of salsa and can of drained and rinsed black beans. Cook all day on low or if you get started later, cook on high. Shred the chicken and serve in warmed corn or flour tortillas with sour cream, brown rice,shredded lettuce, tomato, cheese (and taco sauce if you are like my hubby). One of our FAVORITES that I make a lot because it's soooo easy!! The leftovers make excellent nachos and taco salads if you get tired of tacos.

Sunday - Hubby cooks (The hubs volunteered to cook every Sunday to give this mama a little break - isn't he the best?!)

The one challenge I have been having is forgetting it is a crock pot day until about noon when I am making my kids lunch and no longer have enough time for the crockpot dinner meal to cook. My new approach is setting a reminder on my phone so that I remember at breakfast to get the crockpot going. Works much better for me.

Happy meal planning :)

I'd love to hear what's on the menu at YOUR house too!

Thursday, May 31, 2012

Free Printables Love

One of my favorite things about Pinterest is all of the free printables I find from blogs I previously didn't know existed (and many times, end up following). Oftentimes, I just get ideas and make my own rendition, but sometimes, the printables are perfect (in my humble opinion) as is.

My laundry room is one place in our home that I have not spent a ton of time decorating, yet I spend enough time in there, figured I should! I found this awesome printable from A Pop of Pretty and I couldn't have made it, or said it better myself :) I formatted it in Publisher to 8x10, printed it out, popped it in a black Ikea frame and voila: a print I love, to decorate a once bare wall of my laundry room. She also has a fantastic tutorial for making your own, but I loved this one she offered so much, I decided I'd rather spend the crafting time on other projects and take advantage of her generosity! Isn't this saying so perfectly true? LOVE IT.


I think this one from Three Little Monkeys studio will be my next laundry room free printable to hang.

I also found this Subway Family Rules free printable from Adventures of a Betty Crocker Wannabe and it is in our dining nook area. I had been looking at these for so long, trying to figure out the perfect words to use...and then I found this. I may have changed or added a couple things if I had taken the time to make it myself, but I truly love everything this sign says. And it took me all of 10 seconds for my printer to spit it out.


I found this free subway reading printable from Restless Risa and thought it was perfect for our playroom. It hangs above their reading area and fits quite perfectly.


There are so many more I have found (if you follow me on Pinterest, you already know!), some I have used, others I have drawn inspiration from, and others that are in queue to be used. 

Do you have any favorite free printables? I'd love to see what you have found too!

Tuesday, May 29, 2012

Re-purposing with Chalkboard Paint


When hubby and I bought our first house, we bought this framed art for our entry way. When we moved to our new house a little over a year ago, it really didn't fit well, and to be honest, I was sick of looking at it anyway. I always loved the frame so held onto it and eventually decided to re-purpose it and make it a chalkboard! It turned out great and was super easy!

{BEFORE}

{I HEART MARTHA!!!}

Because this piece did not open well (Would have had to take the paper and hanger off the back to get into it), I decided to just paint the glass in the frame. I suppose you could tape off the frame, but since the frame was darker already, I just decided to wing it. (I used q-tips to clean up any paint that got on the frame before it dried).

{AFTER 1ST COAT}

After the first coat, I was wondering if it was going to turn out streaky looking, but I kept faith and kept on. I ended up doing 3 coats total. I'm not very patient, so I didn't exactly let the coats dry completely before moving onto the next one, but I did my best, and it turned out just fine. After the final coat, I rubbed chalk over the entire board to "season" it, as directed on the paint bottle.


{AFTER FINAL COAT}

{SEASONING THE CHALKBOARD}

Now I have a pretty awesome chalkboard that I need to find a home for around the house. I get so giddy seeing that I created something new that I love, out of something old that I was tired of. I have a feeling there will be many more chalkboard projects in the future for me.

{AFTER}

What chalkboard paint projects have you done, or do you have some on the drawing boards? I'd love to hear about them!

Tuesday, May 8, 2012

Rainbows & Racecars Birthday Party


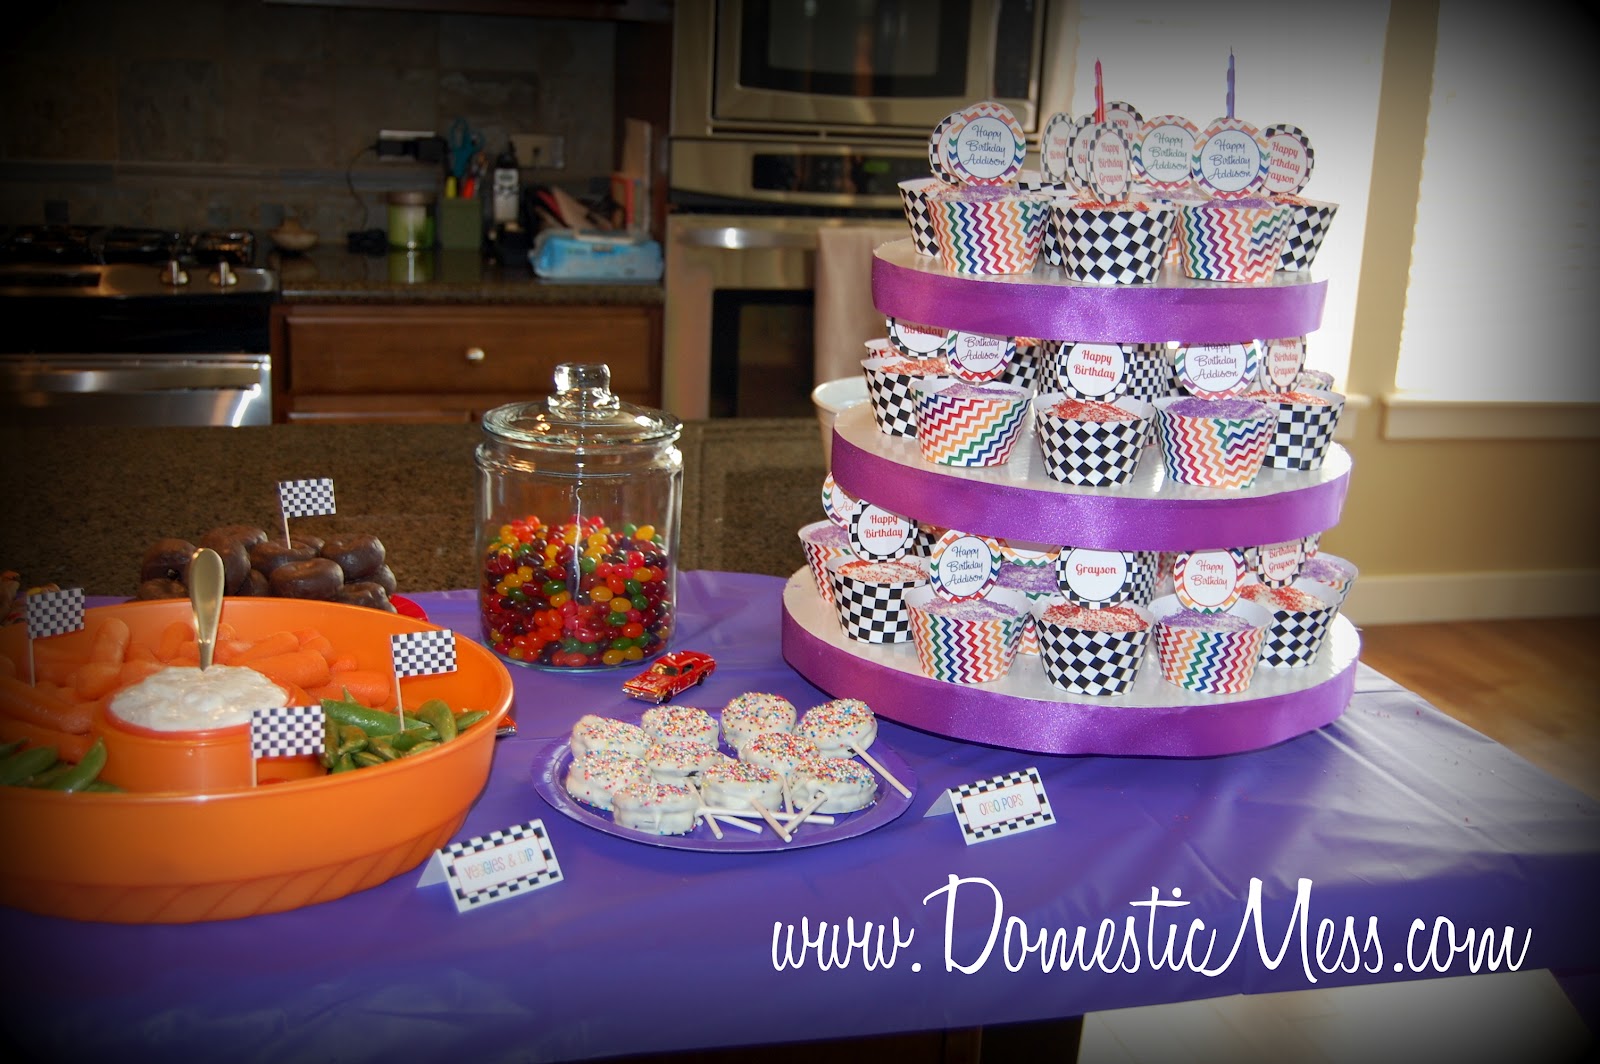
A & G are 25 months apart, so their birthdays are just a month apart, almost to the day. I LOVE planning parties, but this year - and with A's permission, I decided to plan their parties together, rather than doing two separate ones. I am not sure if I will do this next year or any other year, but I do know that it worked well this year and was a lot of fun! Finding a theme that would work for opposite genders was a little tricky at first, but once I found Rainbows and Racecars I knew it would be awesome. So, with the help of pinterest, I got to work planning a super fun party for my 4yr old daughter and 2yr old son. Here it is:

FOOD: Cupcakes (of course), Oreo pops (trickier than I anticipated!), Rainbow jelly beans, Veggies & dip, "Spare tires" (chocolate mini donuts), Rainbow M&M cookies (thanks chips ahoy!), Rainbow goldfish, Chips, Rainbow fruit and marshmallow cream cheese dip, Sub sandwiches, Racecar cutout PB&Js, Cars juice boxes, "fuel up" water bottles, and punch (this punch is REALLY good, but I cut the sugar to 1 cup, or you could probably leave it out completely - it is already really sweet without it). 


FAVORS: A and I tied die cast cars onto mini swirl lollipops. I created some custom hang tags, cut them out, hole punched and we tied them on with red and purple curling ribbon. Easy peasy. 


DECOR: I kept it simple; racecar pendant banner, race table cloths, rainbow birthday banner (Target), some rainbow hangy things (no clue the correct term for these). I had the cupcake toppers and cupcake wrappers custom created by Modern Beautiful - they created a digital file and emailed it over to me and then I did all the printing, cutting, assembling. They were amazing to work with ~ they didn't have anything racecar but quickly whipped up exactly what I had in mind to go with their adorable chevron rainbow print - I highly recommend them if you are in need of some DIY birthday items. I downloaded my food cards for free from Vinnie Pearce and then typed the items in rainbow colors with text boxes before I printed them. I also adapted their free fuel up label and made my own water bottle labels with it. I used red and purple plates, napkins, utensils, and cups for that balance of themes.


ACTIVITIES: Racecar and Rainbow coloring pages, and color your own wooden racecars - (I created "Color" and "Body Shop" signs in publisher to match the theme), ballpit, Rainbow Pinata , and of course with it being a nice day the swing set got plenty of play action.


{My little G man getting some help with his swing from the hubby}

{A taking a swing!}

Such a fun day and a fun party! I adore this theme and am a little sad it's over! I guess I'm off the hook for birthday planning for another year now. 


Monday, April 16, 2012

Garage Organization

Organizing the garage never sounds like a fun task, but I knew it would not get done unless I made it my mission last Saturday. So hubby and I (he was even more excited about this...sense the sarcasm) dove into the mess of our garage shelves to try to put some order back into them. My goal was simple, as it is with any organizing project: a place for everything, and everything in it's place. It took a few hours but we got rid of a ton of stuff (from garbage, to "what IS that?", to garage sale items). There were tools strewn all over the place, kid toys in a bunch of different places, landscaping and paint supplies all over, and nothing had a good organized flow.


A few hours later, and everything has a place and a reason for being there. It may not look super pretty (it's still a garage after all), but it is organized. I needed something to organize smaller things, so just grabbed some boxes from my last Costco trip. Some day soon I would like to replace those with some clear plastic bins so we can see the contents better, but for now it works just fine.


We are lucky to have a large garage with extra shelving space and even a little secret room for storing luggage and such, but we also would like to install some ceiling storage at some point. What kind of garage organization have you done? I would love to hear about your projects and ideas.

Wednesday, April 11, 2012

Let It Be...


This project took a bit longer to complete than anticipated. Not because the project itself took a long time, but it took me a long time to decide on paint colors and letter design. So finally, I decided to stop over-thinking (if you have been following me, you know I struggle here!) and just decide on something - even if it is not the perfect choice. And in the end, I like it a lot.

Oh, and I chose the phrase "Let It Be" because I love the words, I love the song, and I need these words constantly reminding me to just let thing be, to not over-think, to let go of control, and just roll with the unplanned punches of life sometimes.

Here's how I did it:

1. I printed out some large black letters - I think they were 650 font. Then, I cut those out.
2. I picked scrapbook paper I liked, and traced the above black letters on to it. Then, I cut those out.
3. I painted the canvas. I couldn't find the color of blue I wanted, so I mixed a bright turquoise I already had, with a blue-grey color called Blue Jean. I painted 2 coats, including the edges and allowed a few hours between paint coats. (The color in the pictures looks quite a bit brighter than it does in person)


4. I figured out the placement of the letters and where I wanted them on the canvas. You could measure this for precision - I am too impatient though and prefer to eyeball.
5. Then I mod podged them on the canvas.
6. Once the letters were on, I  mod podged over the whole canvas and letters to finish it.
7. Let dry (this is is the stage where you look at it and think you just ruined the whole piece with mod podge - don't worry, it is supposed to look like that and dries clear.


**So if you look close in my finished piece, there are some streaks that did not dry clear on the middle right and I have no idea why. I am a veteran mod podger and have not had this happen before. If anyone can fill me in on what went wrong, or better yet, how to fix it - I would be thrilled :)

Pincushion Creations

Tuesday, April 3, 2012

Organization: Recipe Binder

For far too long my recipe binder was nothing more than a huge stack of recipes in no particular order. This made it not only incredibly time consuming to find a recipe I was looking for, but the lack of organization also made it impossible to remember all the recipes I had. Meal planning was much more challenging as well. I should also mention I have a LOT of recipes, many tried and loved, and many that I want to try, but haven't yet.


It had been on my "to-do" list for at least a year to re-organize this mess. One thing about me (and it's not something I love) - I sometimes can get really caught up in over-thinking - trying to figure out exactly the perfect system, and instead, nothing ends up getting done. I have to very consciously make sure I don't get too stuck in that over-thinking process and just DO things sometimes, whether or not it is the perfect system. (Because an imperfect system is better than no system at all, right? This is what I tell myself!)

So I decided enough was enough and began tackling this project. It was an excellent decision.

1. First I decided I wanted a large 3 ring binder. I think it is a 3 inch - it was pretty much the biggest one they had. I picked lime green.
2. I picked a binder with the clear front covers because I knew I wanted to create a personalized cover and spine.
3. I created the cover and spine...didn't take me very long at all - I just used Publisher, nothing fancy here.
4. I figured out what sections I wanted  - again, I had to stop myself from over-thinking these and just decide :) My sections: Appetizers, Main Dishes, Crockpot, Sides/Salads, Snacks/Kid Food, Breakfast, Dessert/Drinks, and Miscellaneous (things like sweet and sour sauce, homemade pizza sauce, and jam recipes ended up here). I also purchased colored dividers with pockets on the front so that I could put recipes to try in the pocket for each section.


5. I went through my huge stack of recipes and threw out any that didn't sound great to me, or that I had tried and didn't love. Then I made two stacks for each of my sections: recipes tried to file, and recipes to try.
6. Only recipes I have tried and love make it into the clear plastic sleeves in the section. The recipes to try go in the divider pocket for that section as mentioned above.


7. in the back inside pocket of the binder I put some printouts I had for popular recipe substitutes, measurement equivalents, and other useful cooking related info I wanted to keep.
8. In the front inside pocket, I placed recipes I plan to try very soon and want up front for me to remember to add to my meal plan.


I had visions of designing pretty labels for the tabs, but it came down to completing the project or that whole over-thinking thing again, and I decided that for now, my handwriting would work just fine. This may not be my end all system, and I may re-tweak it over time, but for now it is light years better than what I had been dealing with and I love having everything organized and easy to locate.

What system do you use to organize your recipes? I'd love to hear about them!